
Introduction
Paint wash wood is a simple finishing method where you thin paint with water and wipe it across wood so the grain still shows through. People use it to get a soft, airy, “lived-in” look without fully covering the natural character of the wood. It works especially well on furniture, decorative panels, and even larger surfaces like beams or planked walls when you want warmth and texture, not a heavy painted layer.
What Paint Wash Wood Really Means
At its core, paint wash wood is exactly what it sounds like: a “wash” of paint, not a full coat. Instead of painting wood until it looks like a solid block of color, you dilute the paint so it becomes semi-transparent. Then you apply it and wipe it back. The goal is a gentle tint that settles into the wood surface while still letting the grain pattern and natural tone show.
It helps to think of paint wash wood as a way to “tone” wood rather than “paint” it. You can lighten a piece, soften harsh orange or yellow undertones, or give raw wood a calm, muted look. Because the wash is thin, the result usually feels more natural than regular paint.
Paint wash wood is often confused with stain and whitewash, but they are not the same.
Solid paint sits on top of the wood and covers most grain. Even when you use a matte paint, the texture and natural variation are usually hidden. Paint wash wood does the opposite: it intentionally keeps the wood visible and adds just a hint of color.
Stain soaks into wood and changes the color from within. It is designed to penetrate the surface and tint the fibers. A paint wash can behave a little like stain because it is thin, but it is still paint-based. That means it can leave a slightly more “powdery” or “soft” look than many stains, depending on the paint type.
Whitewash is a close cousin. Traditional whitewash often refers to a lime-based finish, but in modern DIY language it usually means diluted white paint applied and wiped back. Paint wash wood can be white, but it can also be gray, beige, muted blue, dusty green, or any other tone. So whitewash is one version of paint wash wood, not the whole category.
Why Paint Wash Wood Is So Popular Right Now
One big reason paint wash wood is popular is that it looks intentional without looking perfect. Modern homes often aim for comfort and warmth, and a washed finish delivers that. It takes the edge off bright or raw wood and creates a calmer, more natural surface.
Another reason is how flexible the style is. Paint wash wood fits clean modern spaces because it can look light and minimal, especially in whites and soft grays. It also fits rustic homes because it can feel aged, weathered, and relaxed. And it works in minimalist design because it keeps detail simple while still adding visual interest through the grain.
People also love paint wash wood because it highlights what makes wood beautiful in the first place. Many finishes hide grain. A wash does the opposite. The wood remains the main character, and the paint is more like a filter that changes the mood.
From a practical point of view, paint wash wood is also forgiving. You are not trying to get perfect coverage. You are aiming for variation and softness. That makes it attractive for DIY projects, especially for people who want a high-end look without complicated tools.
Best Types of Wood for a Paint Wash Finish
Not all wood behaves the same with a washed finish. The type of wood and the grain pattern have a huge effect on the result.
When softwoods work better than hardwoods
Softwoods like pine, cedar, and fir often take a paint wash finish beautifully because they absorb the wash more easily. Pine is especially common because it’s affordable and widely used in furniture and trim. When you apply a wash to pine, you often get that classic “cottage” or “coastal” look where the grain peeks through gently.
Cedar and fir can also work well, especially if you want a slightly more textured surface. These woods can show strong grain lines, which can look great under a thin wash.
Hardwoods like oak and maple can still look amazing with paint wash wood, but they behave differently. Oak has a more open grain, so the wash can settle into the grain lines and create more contrast. That can look rich and detailed, but it can also feel more dramatic than you expected.
Maple is tighter-grained, so it can look smoother and more even. The downside is that some tight-grained hardwoods can resist absorption, so the finish may sit more on top than you want unless the surface is prepared well.
How wood grain affects the final look
Open-grain woods, like oak and ash, have deeper grain texture. A wash can sink into those valleys and make the grain stand out more. This can be beautiful if you want a textured, slightly bold look.
Tight-grain woods, like maple, birch, and some poplar, tend to look smoother. A wash can appear more subtle and uniform, which is great for a clean, soft finish.
Then there’s the issue of blotchiness, which happens when certain sections of wood absorb more than others. Pine and other softwoods are known for this. The good news is that a little variation can look charming with paint wash wood. The key is controlling extreme blotches through good prep and smart wiping.
Paint Types That Work Best for Washing Wood
Choosing the right paint matters because paint wash wood depends on how the paint thins, spreads, and wipes.
Latex paint vs chalk paint vs acrylic paint
Latex paint is one of the most common choices because it’s easy to find, easy to clean up, and blends well with water. It tends to dry a bit smoother and can look more “modern.” It’s often a good option for larger surfaces like walls or paneling because it applies evenly.
Chalk paint is popular for furniture. It has a softer, matte look and often grips well even without heavy priming. When used as a wash, chalk paint can create a slightly powdery, vintage finish that many people love. It can also be more forgiving on older wood.
Acrylic craft paint can work for small projects. It’s easy to thin, and it’s good when you want to test colors. But for large pieces, it can be less consistent and may dry fast in a way that makes blending harder.
In real use, none of these is “perfect” for every project. The best paint for paint wash wood is the one that matches your surface, your desired look, and how much control you want during wiping.
Choosing the right color for a washed effect
White is the classic choice for paint wash wood because it brightens wood while keeping it warm. It is great for Scandinavian, coastal, and farmhouse styles.
Gray is a smart choice when you want a muted, modern feel. Soft grays can reduce orange tones in wood, which is useful for pine or older finishes that have yellowed over time.
Muted colors, like dusty blue or sage green, can add character without looking loud. The key is choosing a tone that feels “washed,” not bold. If the color looks strong on the paint chip, it may be too intense unless you dilute it heavily.
Also think about undertones. A warm white can keep wood cozy. A cool white can make it look crisp. The same goes for gray. A green-gray and a blue-gray can feel very different once they sit on wood grain.
How to Prepare Wood for a Paint Wash Finish
Preparation is the difference between “soft and natural” and “messy and uneven.” The good news is you don’t need fancy tools. You just need a clean surface and a little patience.
Start by cleaning the wood. Dust, grease, and old residue can block absorption. For furniture, a gentle cleaner and a damp cloth are usually enough. Let it dry fully before you apply anything.
Sanding helps the wash spread and absorb more evenly. You don’t always need to sand aggressively. Often, a light sanding is enough to smooth rough spots and remove surface shine. If the wood has a glossy finish, sanding becomes more important because paint wash wood won’t grip well on slick surfaces.
Priming is a “sometimes” step, not an always step. If the wood is raw and absorbent, you may not need primer at all. If the wood has knots, heavy stains, or a finish that could bleed through, a primer or stain-blocking product can help.
Some people also use a pre-stain conditioner, especially on pine, to reduce blotchy absorption. This can make paint wash wood more even. But keep in mind: making absorption more even can also reduce contrast and texture. If you love a naturally varied look, you may prefer to skip it and simply control the finish with wiping.
Step-by-Step Overview of the Paint Wash Wood Process
Paint wash wood is simple, but the timing matters. This is a high-level overview so you understand the flow without turning it into a full tutorial.
You begin by mixing paint and water. The usual idea is to dilute paint enough that it becomes translucent. Some people like a stronger wash; others want it very light. A good mindset is to start lighter, because you can always add another pass. It’s harder to remove a heavy wash once it dries.
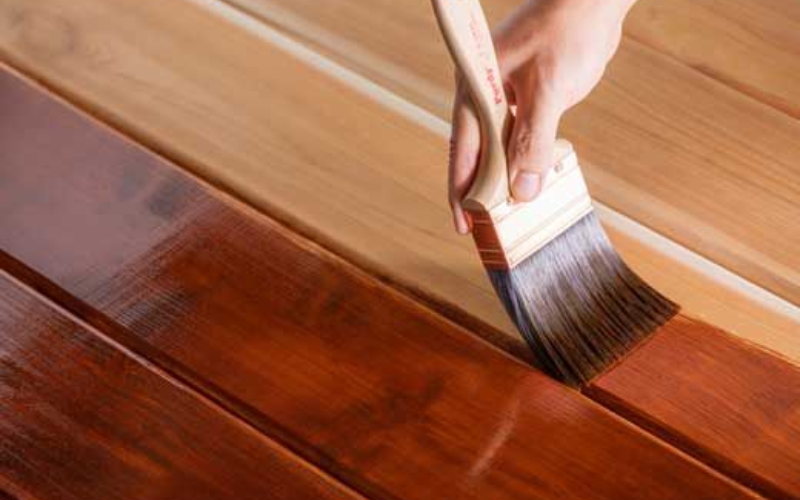
Next, you apply the wash in a thin layer. You can use a brush, cloth, or sponge depending on the surface. The key is working in manageable sections so the wash doesn’t dry before you wipe. Paint wash wood relies on this wipe-back step. You apply, then wipe to control how much color stays.
The wiping technique is where the finish becomes “washed.” Wiping removes excess paint and leaves pigment in the grain and pores. A clean cloth works well. Some people use paper towels, but cloth tends to give smoother results and less lint.
Drying is important because paint can look different when it’s wet versus dry. A wash can look stronger while wet and soften as it dries. Let it dry fully before deciding if you need a second layer.
Layering is how you build the look. One layer can be very subtle. Two layers can look more “finished.” Multiple layers can start to look closer to paint. If your goal is paint wash wood, you usually want to stop while the wood still feels like wood, not like painted furniture.
Common Mistakes That Ruin a Paint Wash Look
Using too much paint is the biggest issue. A wash should be thin. If the paint is too thick, it won’t wipe smoothly and it can leave heavy streaks. It can also hide grain, which defeats the purpose.
Not wiping at the right time is another common mistake. If you wipe too quickly, you may remove too much and the finish becomes barely visible. If you wait too long, the wash starts to dry and wiping becomes patchy. The sweet spot depends on paint type, temperature, and the surface, but the general idea is to apply and wipe while the paint is still workable.
Ignoring wood absorption differences can also cause uneven results. Some areas soak in the wash fast, especially end grain and knots. Other areas resist it. If you apply the same amount everywhere, you may get blotchy spots. The fix is not always “more paint.” Often it’s better to control absorption with prep, or to use lighter layers and build gradually.
Another subtle mistake is choosing a color that is too bright or too pure. Paint wash wood looks best when the color is slightly muted. Very bright white can look harsh. Strong gray can look cold. Softened tones usually look more natural.
Where Paint Wash Wood Looks Best in Real Homes
Paint wash wood is popular because it works in so many places. It can refresh old pieces or make new wood look softer and more relaxed.
On furniture, paint wash wood is often used on tables, dressers, bed frames, shelves, and cabinets. It’s a great option when the wood is visually heavy or too yellow, and you want to lighten it without losing the grain.
On walls, ceilings, and beams, a washed finish can make wood look airy and bright. It can reduce the “log cabin” heaviness of wood while keeping texture. This is especially useful in rooms where you want warmth but also want light and space.
Decorative accents are another sweet spot. Picture frames, floating shelves, wood signs, trim pieces, and small DIY projects look great with paint wash wood because the finish adds style without needing perfect paintwork.
The common thread is this: paint wash wood looks best when you want wood character, but you want the color to feel softer, lighter, and more “designed.”
Final Thoughts
Paint wash wood is one of the easiest ways to give wood a softer, more natural look without covering up what makes it beautiful. The technique is simple, but the results can look high-end when you choose the right paint, prep the surface well, and build the finish gradually. Whether you’re updating furniture, brightening wood tones, or adding gentle texture to a room, paint wash wood offers a balanced finish that feels warm, modern, and real.
FAQ
1. What’s the difference between paint wash and whitewash wood?
Whitewash wood is usually a white version of a washed finish. Paint wash wood is broader. It can be white, but it can also be gray, beige, or muted colors. The technique is similar, but the look can vary a lot based on color and paint type.
2. Can paint wash wood be done on already stained wood?
Yes, but results depend on the existing stain and finish. If the surface is sealed and glossy, the wash may not stick well unless it is lightly sanded. If the stain is dark, a light wash may not show much. Many people test a small hidden spot first before doing the full piece.
3. Does paint wash wood need to be sealed?
Often, yes, especially on furniture and high-touch surfaces. A clear topcoat can protect the finish from wear and stains. For decorative pieces that won’t be handled much, sealing may not be necessary. The decision depends on use and how durable you want the surface to be.
4. How long does a paint wash finish last?
A paint wash finish can last for years, especially if sealed. Without protection, it may wear faster on tabletops, chairs, or floors. The good part is that paint wash wood is usually easy to refresh with another light wash or touch-up, because the finish is thin and forgiving.